-
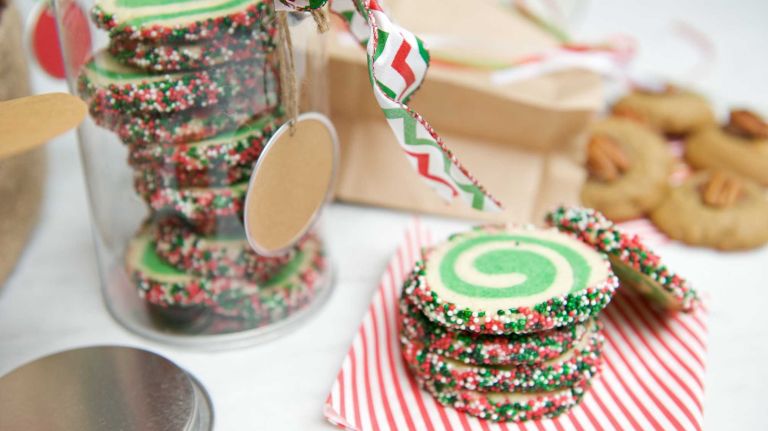 WHAT YOU’LL NEED:
2 cups unbleached all-purpose flour
1/2 teaspoon baking powder
1/2 teaspoon salt
1 cup (2 sticks) unsalted butter, softened
3/4 cup sugar
1 large egg
11/2 teaspoons pure vanilla extract
Green food coloring
2 teaspoons cold water
1 cup red, white and green nonpareils
1 large egg white, lightly beatenHOW TO:
1. Combine the flour, baking powder and salt in a medium mixing bowl.
2. Cream together the butter and sugar in a large mixing bowl, using an electric mixer on medium-high speed, until fluffy, 2 to 3 minutes. Add the egg and vanilla, and beat until smooth. Stir in the flour mixture until just incorporated.
3. Divide the dough into 2 equal portions. Return 1 portion to the mixer and beat in several drops of food coloring so the dough is uniformly bright green.
4. Spread a large piece of plastic wrap on a work surface and sprinkle lightly with flour. Use a rolling pin to roll the white dough into a rough 81/2-inch square. Trim the edges of the dough so it is a neat 8-inch square. On another piece of plastic wrap, repeat with the green cookie dough.
5. Brush the white cookie dough with water. Carefully invert the green cookie dough onto the white cookie dough so the two doughs are perfectly stacked. Peel away plastic wrap from the green dough. Use the plastic wrap underneath the white dough to push and roll the stack into a neat, tight log. Tightly wrap the dough in plastic and freeze until firm, at least 2 hours and up to 2 weeks.
6. Preheat the oven to 350 degrees. Pour the nonpareils into a shallow rectangular dish. Brush the log all over with egg white. Carefully lift the log into the dish. Gently roll it around until the outside is completely coated with nonpareils.
7. Slice the dough into 1/3-inch-thick rounds, rotating the dough often so it doesn’t get flattened as you cut. Place the cookies on parchment-lined baking sheets at least 2 inches apart. Bake until they are pale golden around the edges but still soft on top, 13 to 15 minutes. Let them stand on the baking sheet for 5 minutes, then remove them with a metal spatula to a wire rack to cool completely. Pinwheel Cookies will keep in an airtight container for 2 to 3 days. Makes 24 cookies.” data-id=”19670746″ data-link=”https://www.amny.com/wp-content/uploads/2019/10/10664_image.jpg” class=”wp-image-1.9670746″/>
Photo Credit: Doug Young -
 WHAT YOU’LL NEED:
2 cups unbleached all-purpose flour
1 teaspoon ground ginger
1/4 teaspoon ground cinnamon
1/8 teaspoon ground cloves
1/2 teaspoon salt
1/2 teaspoon baking soda
3/4 cup (11/2 sticks) unsalted butter, softened
3/4 cup packed light brown sugar
1/4 cup dark (not light or blackstrap) molasses
2 large eggs
24 Rolo candies, unwrapped
24 pecan halvesHOW TO:
1. Preheat the oven to 350 degrees. Line several baking sheets with parchment paper.
2. Combine the flour, ginger, cinnamon, cloves, salt and baking soda in a medium-size mixing bowl.
3. Cream together the butter, sugar and molasses in a large mixing bowl with an electric mixer on medium speed. Add the eggs and beat until smooth. Stir in the flour mixture until just combined.
4. Drop the batter by heaping tablespoonfuls onto the prepared baking sheets, leaving about 3 inches between each cookie. (Balls of dough may be placed next to each other on parchment-lined baking sheets, frozen, transferred to zipper-locked plastic freezer bags and stored in the freezer for up to 1 month. Frozen cookies may be placed in the oven directly from the freezer and baked as directed.) Bake the cookies until the edges are firm but the tops are still soft, 6 to 7 minutes. Place a Rolo candy on top of each cookie and continue to bake until cookies are dry on top, another 3 to 4 minutes.
5. Remove baking sheet from oven and transfer to a wire rack. Place a pecan half on top of each Rolo and gently press to flatten. Let stand on the baking sheet for 5 minutes, then carefully slide the entire parchment with the cookies to a wire rack and let cookies cool completely. Gingerbread turtles will keep in an airtight container for 2 to 3 days. Makes about 2 dozen cookies.” data-id=”19670752″ data-link=”https://www.amny.com/wp-content/uploads/2014/12/image-75.jpg” class=”wp-image-1.9670752″/>
Photo Credit: Doug Young -
 WHAT YOU’LL NEED:
2 1/4 cups unbleached all-purpose flour
1/2 teaspoon baking powder
1/4 teaspoon salt
1/2 cup (1 stick) unsalted butter
1/4 cup sugar
1 large egg
1 teaspoon pure vanilla extract
3 tablespoons milk
1 large egg yolk
6 tablespoons red or green sanding sugarHOW TO:
1. Combine the flour, baking powder and salt in a medium-size mixing bowl.
2. Combine the butter and sugar in a large mixing bowl and cream together with an electric mixer on medium-high speed until fluffy, 2 to 3 minutes. Add the egg, vanilla and milk and beat until smooth. With the mixer on low, gradually add the flour mixture until it is all incorporated. Turn the mixer to medium and beat until the dough is smooth.
3. Turn the dough onto a piece of plastic wrap and press into a 6-inch square. Refrigerate it for at least 2 hours or for up to 1 day.
4. Preheat the oven to 350 degrees. Line several baking sheets with parchment paper. Use a sharp chef’s knife to cut the dough square into 4 strips. Cut each strip into 9 pieces. Roll each piece between your palms into a ball. On a lightly floured work surface, roll each ball into an 8-inch-long rope. Form each rope into a pretzel shape. Place the pretzels on prepared baking sheets, leaving at least 2 inches between cookies.
5. Brush the cookies with the egg yolk and sprinkle liberally with sanding sugar. Bake until the cookies are golden and firm, about 15 minutes. Slide the entire parchment sheet with the cookies onto a wire rack and let the cookies cool completely. Let them stand on the baking sheet for 5 minutes, then remove them with a metal spatula to a wire rack to cool completely. Vanilla pretzels will keep in an airtight container for 2 to 3 days. Makes about 36 cookies.” data-id=”19670753″ data-link=”https://www.amny.com/wp-content/uploads/2014/12/image-76.jpg” class=”wp-image-1.9670753″/>
Photo Credit: Doug Young -
 WHAT YOU’LL NEED:
11/2 cups pecans
2 cups flour
1/4 cup unsweetened cocoa powder
1 teaspoon ground cinnamon
1 teaspoon salt
1 cup (2 sticks) unsalted butter, softened
1/2 cup sugar
2 teaspoons water
1 1/2 teaspoons pure vanilla extract
6 tablespoons powdered sugarHOW TO:
1. Preheat the oven to 325 degrees. Line several baking sheets with parchment paper.
2. Place the pecans in a food processor and process until they are finely chopped. Combine the chopped nuts, flour, cocoa powder, cinnamon and salt in a medium-size mixing bowl; set aside.
3. Cream together the butter and sugar in a large mixing bowl, using an electric mixer on medium-high speed, until fluffy, 2 to 3 minutes. Beat the water and vanilla into the butter mixture. Stir in the nut-flour mixture until just combined.
4. Measure out exact tablespoonfuls of dough and roll them between your palms to form balls. Place the balls on a parchment-lined baking sheet, leaving 1½ inches between each cookie. Bake the cookies until they are cooked through but not dry, 18 to 20 minutes. Remove the cookies with a metal spatula to a wire rack to cool.
5. Place the powdered sugar in a shallow bowl. When the cookies are completely cooled, roll each one in sugar to coat. Chocolate and cinnamon Mexican wedding cookies will keep in an airtight container for 2 to 3 days. Makes about 3 dozen cookies.” data-id=”19670756″ data-link=”https://www.amny.com/wp-content/uploads/2019/10/10665_image.jpg” class=”wp-image-1.9670756″/>
Photo Credit: Doug Young -
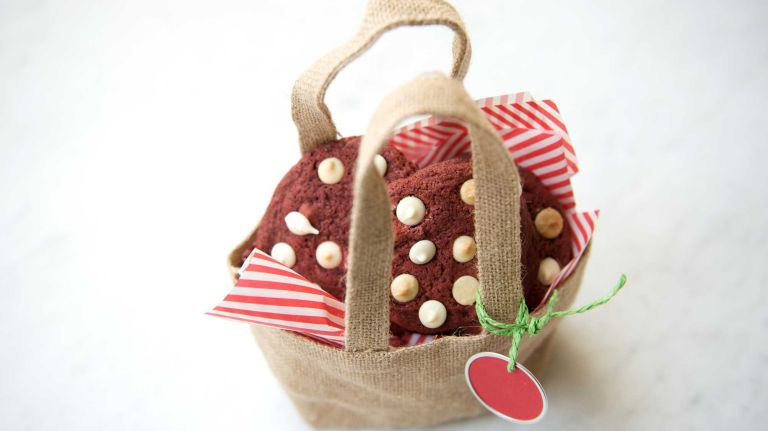 WHAT YOU’LL NEED:
2 cups unbleached all-purpose flour
1/4 cup unsweetened cocoa powder
1 teaspoon baking soda
1 teaspoon salt
1 cup (2 sticks) unsalted butter, melted and cooled slightly
1 cup firmly packed light brown sugar
1/2 cup sugar
2 large eggs
1 teaspoon pure vanilla extract
1 tablespoon red food coloring
2 cups white chocolate chipsHOW TO:
1. Preheat the oven to 350 degrees.
2. Combine the flour, cocoa powder, baking soda and salt in a medium-size mixing bowl.
3. Cream the cooled melted butter and sugars together in a large mixing bowl with a wooden spoon until smooth. Add the eggs and vanilla and beat until smooth. Beat in the food coloring, scraping down the sides of the bowl once or twice as necessary. Stir in the flour mixture until just incorporated. Stir in the white chocolate chips. Place the bowl in the refrigerator for 10 minutes (or for up to 6 hours) to let the dough firm up.
4. Drop the batter by heaping tablespoonfuls onto ungreased baking sheets, leaving about 3 inches between each cookie (Balls of dough may be placed next to each other on parchment-lined baking sheets, then frozen, transferred to zipper-lock plastic freezer bags and stored in the freezer for up to 1 month. Frozen cookies may be placed in the oven directly from the freezer and baked as directed.)
5. Bake the cookies until firm around the edges but still soft on top, 10 to 11 minutes (a minute or two longer for frozen dough). Let the cookies stand on the baking sheet for 5 minutes, then remove them with a metal spatula to a wire rack to cool completely. Red velvet and white chocolate chip cookies will keep in an airtight container for 2 to 3 days. Makes about 4 dozen cookies.” data-id=”19670754″ data-link=”https://www.amny.com/wp-content/uploads/2019/10/10666_image.jpg” class=”wp-image-1.9670754″/>
Photo Credit: Doug Young -
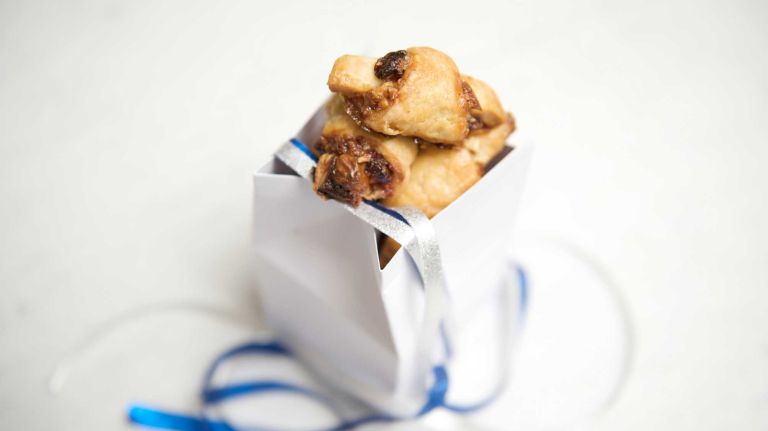 WHAT YOU’LL NEED:
For the dough:
2 cups unbleached all-purpose flour
1 1/2 tablespoons sugar
1/4 teaspoon salt
1 (8-ounce) package chilled cream cheese, cut into pieces
1 cup (2 sticks) chilled unsalted butter, cut into piecesFor the filling:
1/2 cup sugar
1 teaspoon ground cinnamon
1 cup almonds
1/2 cup raspberry preserves
2/3 cup dried cranberries
6 ounces white chocolate, finely chopped, or 6 ounces white chocolate chips
1/4 cup heavy creamHOW TO:
1. Make the dough: Combine the flour, sugar and salt in a food processor and pulse to combine. Add the cream cheese and butter, and pulse until the mixture resembles coarse meal. (Do not overprocess.)
2. Turn the mixture out onto a lightly floured work surface and press it into a ball. Divide the ball into 4 equal pieces and shape each piece into a 4-inch disk. Wrap each disk in plastic and refrigerate it for at least 2 hours and for up to 2 days. (The dough can be frozen for up to 1 month; defrost overnight in the refrigerator before using.)
3. Preheat the oven to 375 degrees. Line 2 baking sheets with parchment paper.
4. Make the filling: Combine the sugar and cinnamon in a small bowl. Place the almonds in a food processor and process until finely chopped. Transfer the chopped almonds to a different bowl. Place the preserves in the food processor and process until any large chunks are broken up. Transfer to a third bowl.
5. Remove 1 dough disk from the refrigerator and, with a lightly floured rolling pin, roll out the dough into a 9-inch circle on a lightly floured work surface. Using a 9-inch plate or pie plate as a guide, trim the edges to make a neat circle.
6. Spread 21/2 tablespoons of the preserves over the dough. Sprinkle with 5 tablespoons of the cranberries. Sprinkle with 1/4 cup white chocolate. Sprinkle with 2 tablespoons of the cinnamon sugar. Sprinkle with 5 tablespoons almonds. Pat the filling firmly with your fingertips to secure it to the dough. Cut the dough circle into 10 wedges. Starting at the wide end, roll each wedge into a crescent and place it on the prepared baking sheet. Place the baking sheet in the freezer for at least 30 minutes. Repeat with the remaining dough disks. (Rolled rugelach can be wrapped in plastic and frozen for up to 1 month. Place the rugelach in the oven directly from the freezer.)
7. Brush the frozen rugelach with the heavy cream and bake them until they are golden, 24 to 25 minutes. Transfer them to wire racks with a metal spatula and let them cool completely. Raspberry and white chocolate rugelach will keep in an airtight container for 2 to 3 days. Makes 40 cookies.” data-id=”19670747″ data-link=”https://www.amny.com/wp-content/uploads/2019/10/10667_image.jpg” class=”wp-image-1.9670747″/>
Photo Credit: Doug Young
In early November, I dropped by a giant craft emporium to pick up some parchment paper. As soon as I entered the store I knew I was in trouble. Christmas carols were playing on the public-address system. Employees were assembling trees. I was sucked into a red and green vortex, finally escaping an hour and a half later with two bags filled with containers, ribbons and gift tags for packaging holiday cookies.
A craft store is a great place to get inspired for the baking season. A variety of inexpensive boxes, bags, baskets and buckets beckons to be filled with sweets. Decorative wax paper, shredded paper, cellophane wrap and baker’s twine await in adjacent aisles. And just try to resist glitter-sprayed pinecones, personalized ornaments and small sprays of holly berries that stand between you and the cash register.
So this year, I planned my baking around my packing materials. When I got my takeout boxes, milk cartons and burlap bags home, I chose recipes to match them. I knew that chocolate- cinnamon Mexican wedding cakes would look great piled into an extra-large snowman mug. Raspberry and white chocolate rugelach, so delicious with milk, would be sweet in the milk cartons. Pinwheels would show well in clear paint cans.
When shopping for pretty containers to package your cookie gifts, keep in mind the following:
Size matters:
I prefer smaller containers, which are less expensive than large ones and easier to fill. Put the focus on quality instead of quantity. Friends, neighbors, colleagues and teachers will all appreciate a small indulgence during a season when it’s difficult to get through the day without overeating.
Protect your creations, and your containers:
Sturdy cookies in tough containers need no cushioning, but if you are going to pack delicate baked goods in soft bags or open baskets, you might want to cushion them with shredded paper. If you have cardboard boxes or paper bags that aren’t coated, you’ll want to line them with wax paper so they won’t get spotted with grease.
Think about freshness:
Cookie tins and other airtight containers will keep your cookies fresh. If you’ve packed your cookies in something open, such as a big teacup or woven basket, wrap them in cellophane to preserve freshness.
Make it personal:
I probably spent almost half an hour browsing the immense gift tag selection before making my choices. For pennies, you can add a lot of personality to your package along with a message or name.


